
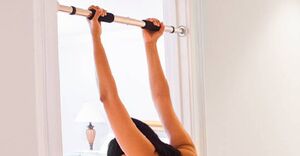
Wall Pull-Up Bar Installation Guide: 7 Essential Tips for Secure Setup
If one is considering adding a new element to their home workout routine, installing a wall-mounted pull-up bar may be a suitable option. This equipment offers convenience, versatility, and is cost-effective when compared to other exercise equipment.
This guide will provide information on the tools and materials required, a step-by-step installation process, and tips for effectively maintaining and using the pull-up bar.
Prepare to enhance your home fitness routine with this essential piece of equipment!
Why Should You Install a Wall-Mounted Pull-Up Bar at Home?
The installation of a Wall-Mounted Pull-Up Bar at home provides a convenient and effective method to supplement your fitness regimen and strengthen your upper body muscles.
This DIY fitness equipment not only eliminates the need to visit a gym but also aids in optimizing your workout area. With a Wall-Mounted Pull-Up Bar, you can easily include a variety of bodyweight exercises in your routine, such as pull-ups, chin-ups, and leg raises, all within the confines of your home.
By engaging multiple muscle groups simultaneously, you can effectively enhance strength and enhance overall fitness levels. The compact design ensures that even in a limited living space, you can still benefit from a versatile workout station.
1. Convenience
The functionality of a Wall-Mounted Pull-Up Bar at home enables individuals to participate in efficient upper body workouts without the necessity of going to a gym.
With a DIY installation process, the pull-up bar can be easily set up in a location according to one’s daily routine, such as in the garage, home gym, or a designated workout area. This ease of access allows for the seamless integration of exercise into daily activities, optimizing time and effort dedicated to maintaining fitness.
Whether the goal is to increase strength, enhance posture, or simply take a quick workout break, the accessibility of a Wall-Mounted Pull-Up Bar provides a versatile option for engaging in physical activity at home.
2. Versatility
A wall-mounted pull-up bar provides versatility in workouts by enabling the performance of various exercises that target different muscle groups.
One can participate in a wide range of exercises using a wall-mounted pull-up bar, such as wide-grip pull-ups to effectively target the back muscles. Including chin-up exercises can aid in strengthening the biceps and enhancing grip strength.
The versatility of this fitness equipment extends to leg raises for core engagement and even modified push-ups for a full-body workout. Not only does it offer a challenging platform for bodyweight exercises, but it also allows for creativity in designing workout routines to maintain a dynamic and engaging fitness regimen.
3. Cost-effective
Choosing a Wall-Mounted Pull-Up Bar for a home gym setup provides a cost-effective alternative to gym memberships or expensive fitness equipment.
Investing in a Wall-Mounted Pull-Up Bar not only eliminates monthly gym subscription fees but also entails a one-time cost that can result in substantial long-term savings. By adopting a do-it-yourself approach to establishing a home gym, individuals can customize the space according to their specific fitness objectives without requiring extra equipment. This not only increases convenience but also promotes a more consistent fitness regimen, maximizing the benefits of the investment in both health and savings.
What Tools and Materials Do You Need?
- For the installation of a Wall-Mounted Pull-Up Bar, essential tools and materials are required, including screws, anchors, a drill, and mounting brackets.
- Having a stud finder can help in locating the best placement for secure mounting.
- A tape measure is necessary to ensure proper spacing and alignment during installation.
- A sturdy ladder or step stool can assist in reaching the desired height for mounting the bar.
- It is also recommended to have a level on hand to ensure the bar is straight and properly aligned.
- Don’t forget a pencil for accurately marking the drilling points before attaching the brackets.
1. Stud Finder
A stud finder is an important tool for locating the studs in the wall where the Wall-Mounted Pull-Up Bar will be securely mounted.
This tool is essential for ensuring the proper installation of the pull-up bar by accurately detecting the wooden or metal studs behind the wall. By identifying the studs, the stud finder helps determine the best location for securely anchoring the pull-up bar, ensuring its stability and safety during use.
Without using a stud finder, there is a risk of mistakenly drilling into unsupported areas of the wall, which could cause the bar to come loose or damage the wall. Therefore, investing in a reliable stud finder reduces the chances of installation errors and improves the overall durability of the pull-up bar setup.
2. Drill
A drill is a necessary tool for creating holes in the wall to attach the mounting brackets of the Wall-Mounted Pull-Up Bar securely.
Using a drill helps ensure that the installation process is smooth and efficient, enabling precision in placing the mounting brackets at the correct positions. By firmly fastening the brackets to the wall with screws, the drill plays a critical role in ensuring the stability and durability of the pull-up bar once it is in place. Without the drill, the installation would be challenging, and the brackets may not be able to support the weight and pressure exerted during exercise routines, potentially leading to accidents or damage to the wall.
3. Screws and Anchors
Screws and anchors play a vital role in securely mounting the Wall-Mounted Pull-Up Bar onto the wall and ensuring stability during exercises.
Proper screws and anchors are essential when installing a pull-up bar to securely attach it to the wall. By using these tools, you can create a stable foundation and reduce the risk of accidents during intense workout sessions.
The screws offer grip and support, while anchors assist in evenly distributing the weight load across the wall to prevent damage or detachment. This meticulous installation process ensures a safe and efficient workout environment.
4. Level
When installing the Wall-Mounted Pull-Up Bar, using a level is important to ensure even and secure mounting on the wall for optimal performance.
This step is essential for achieving the correct alignment of the pull-up bar, as even minor deviations can affect its stability and functionality. By utilizing a level, you can accurately measure the angles and confirm that the bar is mounted at the ideal height for comfortable use. Proper mounting not only improves safety but also prevents unnecessary stress on the wall. The level serves as a guide to ensure that the bar is securely attached, allowing you to confidently participate in your workout routine without worrying about the structural integrity of the installation.
5. Measuring Tape
A measuring tape is an important tool for accurately measuring and marking the placement of the Wall-Mounted Pull-Up Bar on the wall before installation. This tool is crucial for ensuring precise measurements, which are essential for securely mounting the pull-up bar.
By using the measuring tape, one can determine the exact distance needed for proper alignment and drilling of holes. This step is critical as it helps avoid errors during the installation process, ensuring that the pull-up bar is firmly attached to the wall.
Additionally, the measuring tape assists in marking specific points accurately, enabling a smooth installation experience and a sturdy final result.
6. Wrench
A wrench is required for securely tightening the screws and bolts during the assembly of the Wall-Mounted Pull-Up Bar to enhance stability.
This tool is crucial in ensuring that all components of the pull-up bar are firmly linked, reducing the risk of wobbling or loosening during use. By appropriately tightening the fasteners with the wrench, it guarantees the structural integrity of the pull-up bar, making it safe for workouts.
The precision and control offered by the wrench play a key role in achieving the right tension, ultimately creating a durable and trustworthy piece of equipment for your home gym installation.
7. Ladder
A ladder is a necessary tool for reaching higher positions on the wall when installing the Wall-Mounted Pull-Up Bar, ensuring both safety and accessibility.
Using a ladder allows installers to easily reach the upper areas of the wall where the pull-up bar must be securely mounted. This tool is essential in providing a stable platform for the installation process, enabling precise positioning and alignment of the mounting brackets. The ladder also aids in handling necessary tools, such as drills and screws, at elevated heights, simplifying the entire installation procedure. Without the assistance of a ladder, installing the pull-up bar would be challenging and potentially unsafe.
Step-by-Step Guide to Installing a Wall-Mounted Pull-Up Bar
- Begin by using a stud finder to locate the wall studs where you want to mount the pull-up bar. Mark the positions of the studs with a pencil.
- Next, hold the brackets against the wall at the desired height and mark the drill hole locations.
- Use a drill to create pilot holes in the marked spots, making sure to drill into the center of the studs for maximum support.
- After drilling, attach the brackets securely to the wall using the provided screws and a screwdriver.
- Attach the pull-up bar to the brackets according to the manufacturer’s instructions.
- Once everything is securely in place, you’re ready to start your pull-up workout routine!
1. Find a Suitable Location
Selecting an appropriate location for a Wall-Mounted Pull-Up Bar is important to guarantee comfort and functionality in a home gym setup.
When determining the location for installing the pull-up bar, consider the dimensions of the space. Verify that there is sufficient overhead clearance to safely and effectively perform exercises. Accessibility is also crucial – choose a spot that permits easy entry and exit around the bar. Additionally, take into consideration the wall structure for correct installation. By identifying the proper location, one can improve the workout experience and optimize the advantages of having a pull-up bar in the home gym.
2. Locate the Studs
Finding the wall studs is crucial to establish a secure anchor point for effectively and safely mounting the Wall-Mounted Pull-Up Bar.
Studs are typically spaced either 16 or 24 inches apart, so using a stud finder can aid in identifying these crucial support structures behind the drywall. Once the studs are located, it is important to mark their positions accurately to guarantee a secure mounting of the pull-up bar. Using a level is recommended to ensure that the markings are straight and properly aligned.
Double-checking the measurements and markings will help prevent potential mishaps during the installation process, ensuring that the pull-up bar is firmly affixed to the wall.
3. Measure and Mark the Placement
Accurately measuring and marking the placement of the Wall-Mounted Pull-Up Bar is essential for a precise and secure attachment to the wall during installation.
Proper measurement requires using a measuring tape or ruler to determine the exact distance between the mounting points. Once the measurements are obtained, mark the spots on the wall with a pencil or tape to guide the drilling process. Ensuring that the markings are level and aligned is crucial for securely mounting the pull-up bar. Precision in both measurement and marking will lead to a professional-looking installation that is not only safe but also aesthetically pleasing.
4. Drill Holes and Insert Anchors
- To install the Wall-Mounted Pull-Up Bar securely, begin by using a drill to create holes in the wall and inserting anchors to establish a stable foundation.
- Once the holes are drilled, carefully insert the anchors into them. The anchors are essential for securely attaching the pull-up bar to the wall and supporting the weight and pressure during workouts. Ensure the anchors are inserted at the correct depth for stability.
- After the anchors are in place, proceed to affix the mounting brackets for the pull-up bar. Proper alignment and level positioning of the brackets are crucial to securely mount the bar.
5. Attach the Bar to the Wall
The Wall-Mounted Pull-Up Bar should be securely attached to the wall using the provided mounting brackets and hardware to ensure stability during workouts.
- To begin, choose a suitable location on the wall for installation, making sure the surface is strong enough to support the weight of the pull-up bar.
- Use a stud finder to locate the wall studs to find the best anchoring points.
- Then, mark the positions where the mounting brackets will be placed.
- Drill pilot holes into the wall at these marked points using a power drill and the appropriate drill bit.
- Securely attach the mounting brackets to the wall using the provided screws and anchors.
- Carefully hang the pull-up bar onto the mounted brackets and verify its stability before beginning your workout.
6. Secure the Bar with Screws
The Wall-Mounted Pull-Up Bar should be securely fastened to the wall brackets using screws to establish a strong and secure connection for safe usage.
To begin, align the holes on the pull-up bar with those on the wall brackets. Insert the screws into the holes and use a screwdriver to tighten them securely. Ensure that the screws are evenly tightened to distribute the weight load uniformly across the bar. It is essential to adhere to the manufacturer’s instructions regarding the correct screw size and type to be used during installation.
After securing the pull-up bar to the wall brackets, double-check its alignment and stability to ensure a safe and reliable setup for your workouts.
7. Test the Stability
After the installation process, it is recommended to test the stability of the Wall-Mounted Pull-Up Bar. Apply gradual pressure to ensure it is securely mounted and safe for use.
To begin, position yourself under the bar and grasp it firmly with both hands. Slowly pull yourself up to assess its strength and stability. Pay attention to any creaking or shifting noises that might indicate a loose attachment.
Next, gently sway from side to side to evaluate the bar’s resistance to lateral movement. Perform a few hanging leg raises to test if the bar can support your weight without wobbling. These tests are essential to confirm the reliability of the installation and to instill confidence in the pull-up bar’s durability for future workouts.
Tips for Maintaining and Using Your Wall-Mounted Pull-Up Bar
For the optimal longevity and performance of the Wall-Mounted Pull-Up Bar, it is important to adhere to these key maintenance and usage tips.
Regularly cleaning the pull-up bar is essential to prevent the accumulation of dust and sweat, which could result in corrosion over time.
When using the bar, it is important to maintain proper form by engaging the core, retracting the shoulders, and avoiding excessive swinging.
Exploring different grip options such as wide grip, narrow grip, and chin-ups can help target various muscles in the upper body.
To progress, consider increasing the intensity by adding more repetitions or attempting advanced variations like muscle-ups once the basics are mastered.
1. Clean and Disinfect Regularly
Regular cleaning and disinfecting of a Wall-Mounted Pull-Up Bar are essential to maintain hygiene and prevent the buildup of dirt and bacteria.
Ensuring that the pull-up bar is regularly cleaned and disinfected not only keeps the equipment looking good but also plays a vital role in safeguarding health. By incorporating a routine cleaning schedule, any accumulated grime or germs that may have collected on the surface can be effectively eliminated. This practice not only prolongs the life of the pull-up bar but also creates a more sanitary environment for workouts. It is important to remember that a clean pull-up bar is not just about aesthetics but about promoting a healthy and hygienic fitness space.
2. Use Proper Form and Technique
Proper form and technique should be utilized when using the Wall-Mounted Pull-Up Bar to minimize the risk of injuries and optimize the efficacy of workouts. Correct form is essential for performing pull-ups as it aids in effectively engaging the appropriate muscles. By adhering to proper technique, individuals ensure that their muscles are targeted efficiently, resulting in improved outcomes. Employing the correct form can significantly lower the likelihood of strains or other injuries.
Focusing on engaging core muscles and maintaining a straight back throughout the movement is crucial. This not only improves the exercise’s effectiveness but also fosters good posture and overall body strength. It is important to also pay attention to grip and wrist position to enhance performance.
3. Gradually Increase Intensity
Gradually increasing the intensity of workouts on the Wall-Mounted Pull-Up Bar can effectively challenge muscles and help build upper body strength.
Start by including variations such as chin-ups, wide grip pull-ups, and commando pull-ups to target different muscle groups. Once comfortable with these variations, consider adding weight to the pull-up routine using a weight belt or vest to further challenge strength and encourage muscle growth. Adjusting the tempo of repetitions, incorporating isometric holds, and including negatives can enhance muscle endurance and power. It is important to pay attention to the body’s signals and slowly increase workout intensity to prevent overtraining and support continual progress.
4. Use Different Grips and Variations
Utilize various grip styles and exercise variations with the Wall-Mounted Pull-Up Bar to target different muscle groups and improve upper body strength.
By incorporating a variety of grip techniques such as wide grip, narrow grip, and chin-up grip, specific muscles like the latissimus dorsi, biceps, and forearms are engaged differently, resulting in a more holistic upper body workout.
Including variations like leg raises, knee tucks, or one-arm pull-ups can increase the difficulty and encourage greater overall strength development in the back, arms, and core muscles.
These diverse exercises not only prevent reaching a plateau but also assist in building functional strength for daily activities.
Related Posts
Olympic Barbells: Transform Your Workouts with 5 Powerful Benefits Over Standard | NutroOne
Are you looking to level up your weightlifting game? We…
5 Powerful Differences: Olympic Barbells vs. Standard Barbells for Your Fitness Goals | NutroOne
Are you looking to step up your strength training game…
Top 7 Powerful Pull-Up Bar for Your Home Gym | NutroOne
Looking to enhance your home workout routine? Check out these…
No Comments